Posts

Showing posts from 2017

Kaleidoscope

Image
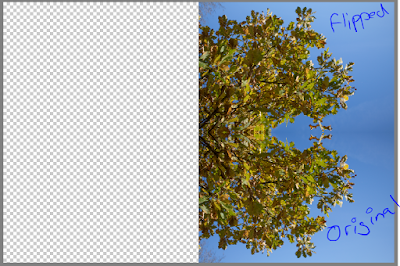
When creating a kaleidoscope you just need one image and then you take it into Photoshop or an editing software. Then you edit the photo to how you want it to as you would normally, changing exposure, contrast saturation, what ever you feel you need to change to make the image better. When the image is fully open, go to Image-Resize-Canvas size and then change the size values to percent and then change the values to 200. Once you have done that you can then start to make the kaleidoscope image and actually see how it might start to come out. Start now with moving the image to one of the corners of the image (where you feel it will have the best effect). Now duplicate the image and flip it horizontally (Image-Rotate-Flip layer horizontally) then move the image above or below the original image. After you have done that you can then duplicate the original again and flip the new duplicate but vertically (Image-Rotate-Flip layer vertically) and then move it to the side of the original

Cloning

Image
Cloning is where you place a tripod down with a camera on down pointing at an area with a good backdrop. Once that is done you place your subject or ask your subject to stay in a position to then take a photo of them, get them to change where they are and then take another shot. Repeat that last process so that you can then have multiple different positions to then stitch together later in Photoshop. Note that when you are taking the images you want to have the settings on manual as then the shutter speed, ISO and focus are the same in each image as then the image will be easier to stitch together.

Long exposure

Image
Long Exposure photos are taken with a slow shutter speed and normally with some motion in the image as well to add a blur of the subject or subjects, creating a cool looking effect. The images that are below I took in Hastings where there was crowds of people due to an event happening that night. I set my tripod up at the side of the road and pointed it across to the other side of the road. Then I lowered the aperture to allow less light in so I could have the shutter speed as slow as possible

Basic analysis of a peers work

Image

Pinhole/Camera-less Photography

Image
Pinhole cameras (aka Camera-less photography) doesn't use a camera at all, but uses a light tight box with a single sheet of light sensitive paper held inside on a side that is opposite to a small opening that has a flap covering it to not always be allowing the light into it and ruining the paper inside. When you want to take an image of something you have to make sure that the box is as still as possible, preferably on a solid floor or object so that it wont move at all other wise the image wont come out clear, it will come out blurred. Then you need to estimate how long you will expose the paper to the light for, if there is a lot of light and the sun is out then you need a shorter time, like 15 seconds, but if there is not as much light then you need to do it for a longer time like 45 seconds or even more depending on the amount of light. Once you have exposed the paper to the light you need to take the box to the dark room and then develop that image to then see the negati

Graphic design - 10/10/17

Image
The design cycle - A client with will ask for a specific image that they want you to take, if they ask for you to capture the moment a glass shatters on the ground then you then are given a problem that you need to solve. So you would then figure out some ideas of how to do it, then you test it and see what is possibly needed to be tweaked and changed to accomplish this image that is desired. After that you will then take a look at what you have discovered and then you try and work from that and if you have enough time then you will reshoot the image if you can to finalise it and make it as best as possible. Golden Spiral Golden Ratio DPI for printing lowest resolution for printing is 72dpi 150dpi for newsprints 300dpi for high quality You can get different quality of images as they can have different resolutions but also different DPI. DPI stands for Dots Per Inch. There are different ratios that are used for poster, photos and other forms of medi

Carousel Art and Design - 4/10/17

Today I had a lesson in art and design, we turned a piece of paper into a 3d object/structure by cutting and folding it in ways that resulted in it standing up. After we had folded and cut he paper and made a self standing object we then shone light onto the paper structure allowing the light to travel through, then we took photos of the structure in different ways, resulting in strange looking images. Materials The materials that we used consisted of paper, biro pens, HB pencil, chalk, charcoal and ink.  Processes I took a piece of paper that had patterns already on it as we had done them the other day, then I cut some slots into the paper and also folded it in different ways resulting in it being able to support itself standing up strait. After the paper was placed, cut and folded in a particular way that made it look interesting I then shone light through and at it causing shadows and different lines on the paper giving even more detail and different looks to the paper.

Developing film - 26/09/17

Image
Today I developed black and white film in the dark room using no light what so ever not even a slight red light like when you develop Photograms, so there is no chance of the film being exposed and ruining the images that I captured. being the first time developing the film it was a bit scary due to the fact that we had to take the film out of the container, cut it, place in a swirl holder to then place in the light tight container to then be able to develop the images, whilst all in complete darkness in a small tight room. I managed to successfully transfer the film to the light tight container fairly easily which made me then question whether or not I did it right, but I had done (thankfully). The most time consuming part was developing the film it self with all the specific amounts of developing fluid and water mix and rotating the container while the mixture was in the container every 30 seconds for 11 minutes straight. Then poring out the mixture and then poring in the 'stop&

Carousel analysis

Document what you did in the session on Tuesday and Wednesday (Pictures, Diary entries, Printouts ETC) On Tuesday we recorded us telling the story of Dr Seuss, we started by reading through the poem to see who was doing what part. Then we set up the microphone on the table and got ready to record. As everyone was doing different parts we recorded each section separately but still in order to keep in the right flow. After it was recorded we then connected the mic to the computer and transferred the files List under the following headings: Research that you carry out in these sessions Skills that you have tried,  Any  processes  and  methods  you used. Any  tools  that you used

Carousel Media - 27/09/17

Media carousel day Yesterday I had a taster of Media, I ended up generating an advert about a BIC ™  pen that has 4 pen colours in one, so it wasn't no ordinary pen resulting in it needing an ad that showed off that it was a 4 in 1. The class started of in 4 groups and discussed ideas for the advert, how it would be lighted and shot. Then the groups got together and pitched their ideas for the class to then choose what they thought was the best idea to then create the ad and piece it together. The class ended up on deciding my groups idea (mainly Heathers idea). Next we then assigned everyone to a task, I was assigned to controlling the main camera. The camera I was manning was the main shot for the advert as it was the wider shot on all of the actors and then became the narrow shot on the main actor who had the BIC ™ pen. The process of making sure everyone was in there place and doing what they was supposed to be doing.

Photographer - Alex Titarenko

Image
The Photographer called Alex Titarenko was born in 1962 in Russia as a Russian artist and photographer, he then became a neutralised american. At the age of 15 Titarenko became the youngest member of an independent photo club Zerkalo, then later went on to graduate with honors from from the department of cinematic and photographic art at leningrad's institute of culture. The image above is one of Titarenko's most famous pieces, where people are walking up some steps and touching the railing to the side. This could of been created by having a long shutter speed that then captures the movement of the people walking and touching the railing. The method that is used creates an image of what can look like a monster making its way up the steps with multiple hands and legs that pause for the right amount of time to show them in more detail. The image has been captured off centre resulting in there being more in the image even when the image it self is only square. 

Cameraless Photographer - Susan Derges

Image
Susan Derges is a photographic artist born in England in 1955, she specialises in cameraless photography (aka, photograms). Image source: https://blogger.googleusercontent.com/img/b/R29vZ2xl/AVvXsEijFpDzU52M3EfVFaNEGYMnEqgjcLVKEAZOPD1Hozff-KF1u5ZtDJOSIXu-zg2AqgexYHVQxfB-qhh9oY7ViodpdaM4OWFjR3YP6snEIyUBK9IPc5WtqJLkyiDI5HP72G3AAWxXUL1gSC4/s1600/5.jpg Cameraless photography is when you generate a photographic image with out using a camera, this is achieved by placing objects on top of light-sensitive paper and then exposing it to light, leaving any areas that aren't covered to be completely exposed to the light. This results normally in a negative shadow image that shows differences in shade depending on how transparent the object that was place on top was. Originally having trained in painting, she had expressed an early interest in abstraction. Derges then turned to cameraless photography after having some frustration with the way that the  "the camera always separat

First Evaluation of the Carousel (21/09/17 WEEK 1)

Signifier - What is making you think "Rose" Signified - The thing you are thinking of "Love" Denotation - The simple thing it self "House" Connotation - Things that make you think of that thing "Home" Symbolic - Picture that is clearly the thing "Stop sign" Iconic signs - Things that represent something else "Mcdonalds logo" Indexical signs - No resemblance between the signifier and the signified "gender signs"

Shutter speed and Depth of Field - 20/09/17

Image
Today we experimented with depth of field and different shutter speeds to see the different effect that they allow for. Changing the shutter speed can allow you to get a fast moving object to look stationary if the shutter speed is fast enough, which allows you to capture things in mid air as if it is floating or just capture the subject you want in a clear and crisp way with no blur. The other spectrum of the shutter speed is if the shutter speed is slow, this allows more light to get in though so settings will need to be changed to comply with that exposure. When the shutter speed is slow it can blur subjects if they are moving or if you have a static subject but everything else around is moving you can then have blurred surroundings with movement in them while the subject is clear and with no blur, causing a fairly cool looking image. The shutter speed all determines on what sort of image you are going for and how you want the subject to look in the image. Depth of field is what y

SLR anatomy

How a SLR or DSLR takes a picture: SLR's and DSLR's are almost identical to each other in the way they function, the only difference is how they capture the image. SLR's capture the image via film, so when the mirror flips up it then allows the light to go through to the film, the same goes for the DSLR but in stead of film it goes to a sensor. When you press the shutter button on a camera to take a picture you trigger the aperture to move to where you have specified for it to be at, it can be restricting the light going through or allow more light through. the way to counteract this is to change the shutter speed to longer or shorter, therefore allowing the film or sensor to be exposed to light for longer.

Dark room - 19/09/17

Today in the dark room we produced some more images with a pin hole cameras, after we developed those images we then proceeded to change them from a negative image to a positive, we did this with the enlargers and then we manually developed that image. The exposure time that we used was the highest that the enlarger would go and that was 99 seconds. The images that was produced came out fairly well, it was a little underexposed so the image wasn't perfect, but it still was only my 4th Pin hole camera Photo. How to use a Pin hole camera and how to take a negative image and develop the positive of it: To use the pin hole cameras you place a piece of dark room paper in the pin hole camera (shoe box), make sure that you are doing this in a dark room as it will expose the light to the paper and that will result in that piece being unusable, so handle it all in a dark room it self. Then take the pin hole camera out of the dark room, but making sure that the light isn't able to g