Lenticular is a 3d form of photography allowing you to show two images on one print. This is done with triangular prisms side by side with one image on one of the surfaces and another on the other side.
Eadweard Muybridge started professional photography from sometime between 1861 and 1866 after he had recovered from a serious accident where he was bodily ejected out of a stagecoach and hit his head. Muybridge then made his way back to the states in 1867 where he became successful with his new talent due to his highly proficient technical skills and an artist's eye. His main focuses where on landscape and architectural photography. Muybridge had even converted a lightweight carriage into his own portable darkroom to be able to carry out his work more efficiently. Muybridge established his reputation with photos of the Yosemite Valley wilderness and areas around San Francisco. In 1872 Leland Stanford (The former governor of California and race-horse owner) hired Muybridge for some photographic studies on horses. The studies was to find out if all four hooves of a horse were of the ground while trotting. Muybridge began experimenting with 12 cameras set up in an array ...
This Unit allows you to show practical skills with the analog side of things more, as well as the digital side showing more of your software skills with editing the images or image to end up how you want it to be. A 3D or 3 dimensional image is an image that gives off the illusion of a physical presents, this means that for an image to be 3D it needs to give the illusion or effect of being a physical thing. To make sure that the image that I create has that desired effect of looking 3D, with this I will also make sure that other people feel that it has that illusion and not just me. An example of 3D photography could be a hologram that consists of 4 images with clear plastic or glass in the shape of a pyramid, with the tip end down on a screen. The screen then reflects onto the clear plastic giving the illusion of there actually being a physical object. Another example is taking a picture of someones head from both side, face on and from the back and then editing those images toget...
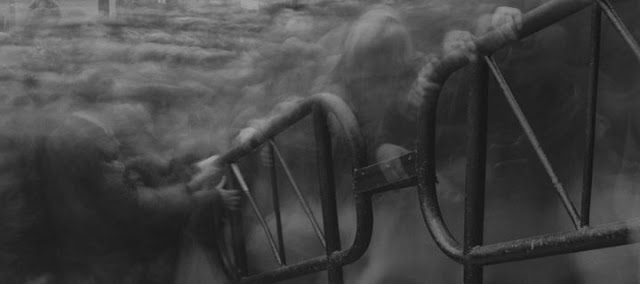
The Photographer called Alex Titarenko was born in 1962 in Russia as a Russian artist and photographer, he then became a neutralised american. At the age of 15 Titarenko became the youngest member of an independent photo club Zerkalo, then later went on to graduate with honors from from the department of cinematic and photographic art at leningrad's institute of culture. The image above is one of Titarenko's most famous pieces, where people are walking up some steps and touching the railing to the side. This could of been created by having a long shutter speed that then captures the movement of the people walking and touching the railing. The method that is used creates an image of what can look like a monster making its way up the steps with multiple hands and legs that pause for the right amount of time to show them in more detail. The image has been captured off centre resulting in there being more in the image even when the image it self is only square.


Comments
Post a Comment